
PowerShellによりExcelのシートの並び替えをするサンプルコードを紹介します。
仕様
以下のようなサンプルファイルを用意します。
Book1.xlsx
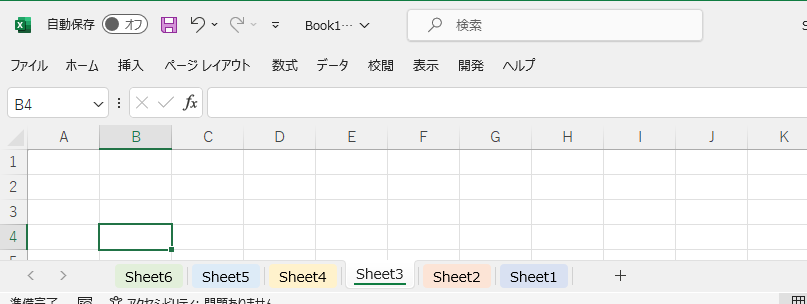
うまくいけば、PowerShell実行後にシートがSheet1→Sheet2→Sheet3・・・Sheet6の並び順に変わります。
以下のキャプチャのイメージです

ソースコード
ソースはPowerShellで記述します。
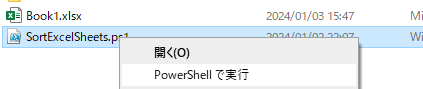
SortExcelSheets.ps1
$excel = New-Object -ComObject Excel.Application
$book = $null

$excel.Visible = $false
$excel.DisplayAlerts = $false

$fileName  = "Book1.xlsx"
$filePath = (Convert-Path .) + "/" + $fileName

$book = $excel.Workbooks.Open($filePath)

# シート名の取得
$workArray = @()
foreach ($s in $book.sheets){
    $workArray+= $s.name
}

# シート名の並び替え(昇順)
$workArray = $workArray | Sort-Object

# シートの並び替え
# (1シート目)
$sheetCount = $book.worksheets.count
$book.worksheets($workArray[0]).Move($book.worksheets(1))
# (2シート目以降)
for( $i=2; $i -le $sheetCount;$i++){
    $book.worksheets($workArray[$i-1]).Move($book.worksheets($i))
}

[void]$book.Save()
[void]$book.Close($false)
[void][System.Runtime.Interopservices.Marshal]::ReleaseComObject($book)

[void]$excel.Quit()
[void][System.Runtime.Interopservices.Marshal]::ReleaseComObject($excel)

Pause
ちなみに降順にしたい場合は、Sort-Objectの部分にパラメータを追加すればよいです。
実行
実行手順
では上記のPowerShellを実行します。
実行は右クリックメニューの「PowerShellで実行」をクリックします。
実行結果
実行後、シートがSheet1→Sheet2→Sheet3・・・Sheet6の並び順に変わりました。

参考情報
環境
下記の環境で作成・実行しております。
| No. | 環境 | バージョン |
|---|---|---|
| 1 | OS | Windows10 |
| 2 | PowerShell | 5.1 |
以上です。